A Little About Me

My photo
Burnaby, BC, Canada
Hi My name is Serena also known as "Reenybeanies" I became a Stampin’ Up! demonstrator because I enjoy Stamping and Crafting. I love being part of a company that inspires my creativity with exclusive stamps and accessories! I Joined Stampin'Up! in 2004 as a Club member I loved it so much spending time with new friends just sitting and talking and of course learning new and exciting techniques so I decided to become a demonstrator so that I could teach people the exciting world of Rubber Stamps. Where you can create Cards, Scrapbook Pages, Home Decor, Books, and More! its just not a craft its a time to spend a little time on you. I also wanted the versatility of having my own home business. I love being part of a company that allows me to plan my business around my schedule. If you want more information about Stampin’ Up!’s exciting products, or about Stampin’ Up!’s unique business opportunity, please contact me either through email or by phone. I can't wait to talk to you and share some fun and exciting projects.

Thursday, August 29, 2013

BUTTERFLY BUNDLE SPECIAL OFFER


September's Promotion


 Starting August 29th (Today) till September 30th get 15 percent off when you buy this gorgeous butterfly stamp and punch bundle!

This bundle includes: Papillion Potpourri Clear or Wood Mount Stamp Set found on Page 90 in the Annual Catalogue. and the Bitty Butterfly Punch found on 183 in the Annual Catalogue

135311 - $33.92 Butterfly Bundle Clear Mount
135312 - $38.11 Butterfly Bundle Wood Mount


Saturday, August 24, 2013

COMING SOON........

ENVELOPE PUNCH BOARD

We got the opportunity to see this in action at StampinUp's Convention 2013. It will be available starting September 1, 2013 so keep your eyes pealed I will post details of it September 1st.


Tutorial - Friendship Flip Card Using Thinlet Dies

By: Penny Hanuszak


I got this tutorial off a great demonstrator out in
Abbotsford, BC she is very talented as I wanted
to show you how to use these great new dies
from StampinUp!


Today I want to share a tutorial with you on this Flip Card I've made using the new Label Card Thinlits Dies. The theme for this card is friendship and what could be more friendlier than a tea party!

Supplies Used:

Stamp Set: Tea Party 129138
Card Stock: Crisp Cantaloupe, Calypso Coral and Very Vanilla
DSP: Venetian Romance
Ink: Calypso Coral
Tools: Big Shot Machine, Magnetic Platform, Label Card Thinlits, Labels Collection Die Cuts (the smallest label), Elegant Butterfly Punch, Perfect Polka Dots Embossing Folder, Oval from Oval Framelits.
Accessories: Basic Pearls, 3/8 Ruffle Stretch Trim in Crisp Cantaloupe, Sticky Strip, Snail Adhesive, Sponge Dauber

Cutting Out the Card Base:
I personally like the look of the Flip Card when you use 8 1/2" card stock instead of the recommended 5 1/2 x 6 size. I like having the extra 2 1/2" of card stock to write on and when the card is closed, the message area is hidden behind the extra fold. For me, that's really cool and I think it adds even more of a "wow" factor.

STEP ONE CUTTING YOUR CARD BASE:

Cut a 5 3/8 x 8 1/2" piece of Crisp Cantaloupe card stock. With the cutting edge of the Thinlits Die facing down, insert the card stock under the flip part of the die and extend the additional card stock over the top of the die.
TIP: Just a note about the width of the paper for this version of a Flip Card. if you have difficulty fitting it through the die, it may be just a smidgen too wide. I found that when I cut my card stock at 5 1/2" and tried to fit the card stock through the die, it was crooked and wouldn't lay flat. To remedy that and make sure that the finished card base was aligned properly with the die, I cut an additional 1/8" inch off the width. As soon as I did that, the card stock fit perfectly through the die, and all was well. So experiment with the size before you start on your actual card to make sure you have the right cut.


In this view you can see everything aligned perfectly, before I roll it through the Big Shot. Make sure before you do any cutting on the new Magnetic Platform and on the regular platform, that you put down a standard plastic cutting pad. Your sandwich from the base up should be:

1. Magnetic Platform/or regular platform
2. Standard Cutting Pad ( a flat one works best)
3. Thinlit placed over single piece of card stock
4. Standard Cutting Pad (a flat one works best)
 

When you take the card stock out of the Big Shot it will look like this. Although the picture is faint, you can see the fold lines for the flip portion of the card quite clearly. There is also a fold line, albeit a faint one, 2 5/8" from the right side of the card.
STEP TWO: FOLDING THE CREASE LINES
Fold the right hand side toward the center of the card and using your bone folder make a crease. Later on you'll add some card stock and designer paper to make this side of the card look terrific.
Fold the left side of the card towards the center from the second fold line and use your bone folder to make a crease.

Finally fold the first fold towards the card center and use your bone folder to run a crease down the fold. The flip portion of the card will fold towards the center.
This is what your card will look like when everything is folded together. It will be a perfect A2 size card. Wasn't that easy?

STEP THREE: DECORATING YOUR CARD


Here are the basic elements for decorating this card. You will need to cut a 2 1/2 x 5 2/8" piece of Calypso Coral card stock and a piece of Venetian Romance Designer Series Paper 2 1/4x 5 for the panel on the right hand side of the card. Stamp the images from the Tea Party set in Calypso Coral ink on Very Vanilla card stock. You'll need to cut two labels in Calypso Coral ink using the smallest label in the Label Collection Framelits. Before assembling these pieces I used a sponge dauber to distress the edges of all the design pieces.
I embossed both side folds of the card with the Perfect Polka Dot Embossing Folder and left the center part of the card plain except for the stamped image of the teapot which is in Calypso Coral Ink. In this view you can see the small label attached to the swing or flip part of the card. I used the smallest label from the Label Collections Framelits set. It fits perfectly.

In this view I've attached the You're Just My Cup of Tea stamped image from the Tea Party set with dimensionals to the back of the Flip. The image was stamped in Calypso Coral on Very Vanilla card stock. I added a single basic pearl to the center of the flower at the top of the image. Wow this card is really starting to come together!

In this view you can see how I've added the designer paper and Calypso Coral card stock to the front right fold. I also added a strip of 3/8" Ruffle Stretch Trim in Crisp Cantaloupe. Before attaching the trim I ran a strip of Sticky Strip down the outside edge of fold. This ribbon is so gorgeous and on this card adds just the perfect feminine touch.
 
I stamped a piece of Calypso Coral card stock with the Tea Party image before cutting it out with the Elegant Butterfly punch. Four small basic pearls were attached in the center. Before mounting the butterfly to the front of the card, I used the bone folder to give some dimension to the wings.
In this picture you can see the front Flip with the Tea Party image added on top of the Calypso Coral label. I cut this image out using the second oval in the new Ovals Collection Framelits........ perfect! To add some interest I actually stamped this image twice and then hand cut out the Tea Party banner part of the image and attached it with dimensionals to the face of the image. Three small basic pearls were spaced along the banner to emphasize the words.

To finish the card I added a small strip of Calypso Coral card stock on the front left hand side of the card. I think it adds some balance.

And that's all there was to assembling this very feminine friendship card. I hope you enjoyed it and learned a little more about using the Label Card Thinlits.

I'd love to hear your comments. Thanks for dropping by!

GET YOUR BUNDLES AND SAVE

2013-2014 ANNUAL CATALOG BUNDLES

 
Chalk  Talk Clear Bundle
Chalk Talk Bundle – page 12
Chalk Talk stamp set and coordinating Chalk Talk Framelits Dies (p. 187).
$53.50- 132731 Wood-Mount Bundle
$45.75-132730 Clear-Mount Bundle 

Label Love Clear Bundle
Label Love Bundle – page 33

Label Love Stamp Set and coordinating Artisan Label Punch (p. 181).
$44.95-132723 Wood-Mount Bundle
$37.75-132722 Clear-Mount Bundle   

Backyard Basics Wood Bundle
Backyard Basics – page 79
Backyard Basics Stamp Set and coordinating Backyard Basics Framelits Dies (p. 187).
$52.50-132729 Wood-Mount Bundle
$44.95-132728 Clear-Mount Bundle
 
Wildflower Meadow Wood Bundle
Wildflower Meadow Bundle – page 83
Wildflower Meadow Background Stamp and coordinating Wildflower Meadow Embossing Folder (p. 191).
$26.95-132735 Wood-Mount Bundle
$22.75-132985 Clear-Mount Bundle
Flower Shop Wood Bundle
Flower Shop Bundle – page 94
Flower Shop Stamp Set and coordinating Pansy Punch (p. 183).
$43.95-132727 Wood-Mount Bundle
$37.25-132726 Clear-Mount Bundle

Beautifully Baroque Wood Bundle
Beautifully Baroque Bundle – page 113
Beautifully Baroque Stamp and coordinating Beautifully Baroque Embossing Folder (p. 191).
$23.75-132732

Mosaic Madness Wood Bundle
Mosaic Madness Bundle – page 123
Mosaic Madness Stamp Set and coordinating Mosaic Punch (p. 180).
$46.50-132734 Wood-Mount Bundle
$37.95-132733 Clear-Mount Bundle
Six-Sided Sampler Wood Bundle
Six-Sided Sampler Bundle – page 125
Buy the Six-Sided Sampler Stamp Set and coordinating Hexagon Punch (p. 180).
$46.50-132725 Wood-Mount Bundle
$37.95-132724 Clear-Mount Bundle


Tag a Bag Bundle

Tag a Bag & Box Bundles – page 158

Gift bags and accessories in a bundle.


 $12.50- 131371 

Tag a Box Bundle
Boxes and Accessories in a Bundle - page 158
$15.95- 131372

Clear Block Starter Bundle
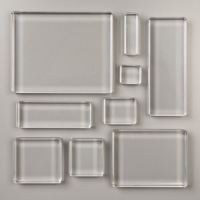
Clear Block Bundles – page 196
Clear Block Starter Bundle (Blocks C, D, H)
$26.95 -129851

Clear Block Bundle
Clear Block Bundle - page196
(Blocks A-I)
$89.95- 118491

Show & Tell Bundle
Show & Tell Bundle - online
Show& Tell 1 and 2 Stamp Sets, and Seeing the Possibilities Online Class
$43.95 -134533

What To Washi Bundle - Digital Download
What to Washi Bundle - online
7 PDF documents, 2 Videos, 4 pkgs of Washi Tape (3 rolls per pkg), 20 Whisper White Note Cards & Envelopes
$45.95- 134743  (Save 40% on this bundle)


2013-2014 HOLIDAY CATALOG BUNDLES

Thankful Wood-Mount Bundle
Thankful Stamp/Tablescape Bundle – page 18
Thankful single stamp set and Thankful Tablescape Simply Created Kit
$32.95-133341 Wood-Mount Bundle

Snowflake Season Simply Sent
Be Very Merry/Snowflake Season Bundle – page 26
Be Very Merry single stamp set and Snowflake Season Simply Sent
$22.95- 133281 Wood-Mount Bundle

Merry Little Christmas Wood-Mount Bundle
Merry Little Christmas Bundle – page 27
Merry Little Christmas stamp set and Merry Little Christmas Simply Created Card Kit
$24.95-133286 Wood-Mount Bundle
$21.95-133287 Clear-Mount Bundle

Festive Flurry Wood-Mount Bundle
Festive Flurry Bundle – page 30
Festive Flurry stamp set and Festive Flurry Framelits Dies
$67.95-133284 Wood-Mount Bundle
$57.95-133285 Clear-Mount Bundle

Christmas Collectables Wood-Mount Bundle
Christmas Collectibles Bundle – page 35
Christmas Collectibles stamp set and Christmas Ornament Punch
$38.95-133282 Wood-Mount Bundle
$33.95-133283 Clear-Mount Bundle

Morning Post Clear-Mount Bundle
Morning Post Bundle - page 36
Morning Post stamp set and Mini Muslin Bags
$28.95-133292 Clear-Mount Bundle

Tags 4 You Wood-Mount Bundle
Tags 4 You Bundle – page 37
Tags 4 You stamp set and Label Bracket Punch
$37.95-133293 Wood-Mount Bundle
$32.95-133294 Clear-Mount Bundle

Tuesday, August 20, 2013

Stampin' Up! Rotary Trimmer & Blades Available!


CM1412B
Turn your Stampin' Trimmer ($41.95, #126889) into a decorative cutting machine! The Stampin' Trimmer Rotary Addition ($17.95 #129407) is now available along with FOUR different decorative cutting blades! Products are shown on pages 176 and 177 of the 2013-2014 Annual Catalog and page 24 of the Stampin' Up! Holiday Catalog.
Watch this "Show Me How" Video from Stampin' Up! with tips on using the Rotary Trimmer and blades.

129407Stampin' Trimmer Rotary Addition
Includes rotary track and handle and a straight-edge blade
129408Straight Stampin' Trimmer Rotary Cutting Blades
129409Tiny Wave Stampin' Trimmer Rotary Cutting Blade
129410Small Scallop Stampin' Trimmer Rotary Cutting Blade
131375Stampin' Trimmer Replacement Cutting Mat
132788Perforating Stampin' Trimmer Rotary Cutting Blade
Debuted in the 2013 holiday catalog, page 24

Here's more information on the Stampin' Trimmer (this trimmer will become your favorite, too)- click here.


Monday, August 19, 2013

Stampin' Up! Trimmer


Introducing the Stampin' Trimmer! Although paper trimmers are a common crafting tool, this trimmer was designed exclusively by paper crafters for paper crafters AND because it was made by Stampin' Up!, you know it's a cut above the rest!
Features of the All-New Stampin' Trimmer
  • An extra-wide 6-1/4" cutting base and an extended 14-1/2" ruler
    • The extra-wide cutting base provides a large work area and is marked in 1/4" (4 mm) increments, allowing for small measurements.
    • The right-side grid helps you measure and cut very thin strips.
    • The extended cutting arm has a stabilizing leg to provide a sturdy and steady cutting surface for longer cuts.
    • When fully extended, the extended cutting arm sits flush with the trimmer base, providing more accurate and consistent measurements across the entire surface.
    • The cutting base and track include a full ruler, incorporating measurements down to 1/16" and grid lines that mark each quarter inch.
    • All rulers and measurements on the base are printed under a plastic cover so your measurements won't wear off.
    • The base has nonskid feet, which keeps the Stampin' Trimmer securely in place on your work area.
  • A full 12" cutting and scoring track
    • The extra-long cutting track has space at the top and bottom so you don't have to take the cutting and scoring blades out when you're not using them.
    • The track gives you enough space to cut or score a full 12" (30.5 cm) without having to remove or switch out handles.
    • The cutting track locks in place for secure storage or transport.
    • The track includes an insertion point for cutting and scoring blade handles so you can easily insert handles into the cutting track.
  • Specially designed handles and cutting track to ensure straight cuts
    • The hook on the scoring and cutting blade handles keeps the handles stable so the cuts are as straight as possible.
    • Handles come in two colors: dark for cutting, light for scoring.
    • The precision tip on the cutting blade allows you to pinpoint precisely where you're cutting.
    • The point on the side of each handle shows you where the blade will cut, making it easy to see exactly where your cuts and scores will begin.
  • Storage compartment under base
    • The storage compartment holds scoring and cutting tools such as a Bone Folder, Simply Scored Stylus, extra scoring and cutting blades, and even business cards.
    • Separate compartments within the storage compartment keep your tools organized, and the clear cover makes it easy to see what you've stored.
Product details: item 126889; $41.95. Click to find the trimmer in my on-line store.


CUSTOMER QUESTIONS? Please email me (reenybeanies-stampinup@shaw.ca) for a prompt response.


WIN FREE STAMPS: New Hostess Code UABWU3YH

Enter to win $35 in FREE PRODUCT at the same time! Now that’s an offer no one can refuse lol. There may be multiple winners (depending on how many orders are placed using the code), so your chances are higher!
 
TO ENTER MYSTERY HOSTESS DRAWING:
 
  • Step 1: Place an order in my Online Store (min $35)
    now thru September 20, 2013
  • Step 2: ENTER HOSTESS CODE: UABWU3YH
    in the shopping cart at check out – see below for details and how to enter code
     
shop online
…………………………………………………………………………………………………………….

HOW THE MYSTERY CODE WORKS:

  • EVERYTHING in my Online Store Qualifies
  • Free Tutorial: with $50 min. online order.
  • Frequent Buyer Points: Earn 1 FBP w/ every $35 in orders, collect for Free Stamps
  • NOTE: ORDERS OVER $200 – DO NOT ENTER CODE You will automatically get Stampin’ Rewards – $35 Free (and up) with orders over $200
     
    MYSTERY HOSTESS DETAILS
    • Winner Drawn:
      • DrawnVia Random.org. Announced here my blog
      • Each $35 order placed in my online store using the Hostess Code will be automatically counted in the drawing.
      • For each $35 in Free Stampin’ Rewards accumulated, I will draw a winner. There may be multiple winners, making your chances of winning higher!
    IMPORTANT DON’T PLACE ORDER WITHOUT CODE:
    It can NOT be added later. If you have forgotten to use the code and placed your order, the only way to enter at this point would be to place another order.
    REMINDER: Orders over $200 should not use the hostess code
    This way you can be your own hostess…no need to await the drawing for free stamps. Take advantage of your own freebies with your order.
     

Sunday, August 18, 2013

THE GIFT BOW


Today’s Post features the Gift Bow Bigz L Die , and a tutorial on how to use it to make several different size bows. This die is so easy to use and the end result are beautiful!


Gift Bow Bigz L Die
Item: 129977

Pretty Presents Designer Bows
Item: 132186

DIRECTIONS & TIPS


  • To use the die build your regular sandwich using the Standard Cutting Pads, and run it through the Big Shot.
  • This die is different from our other dies — it’s a steel roll die and that means it can cut three to four pieces of paper at a time. It can also cut fabric! When you have cut your paper you will have five bow pieces. Now you can get to bow making.
  • You will need a bone folder, and SNAIL Adhesive. Run your bone folder over the paper and break up the paper fibers and then assemble!
  • To make the large bow you will need the large piece, the two bow end pieces and the wrap piece.
    • Put a little bit of SNAIL in the middle of the large piece, and fold the ends of the large piece in on its self.
    • Then bend the wrap piece around the middle to create a finished look.
    • Then adhere the end pieces onto the bow.
  • To make the smaller bow you will need to cut out two pieces of paper on the Gift Bow Bigz L Die.
    • Take two of the bow pieces and fold them in half.
    • Adhere them to each other in the middle and assemble the same way as large bow.
  • You can play with the pieces to create as simple or as elaborate bows as you want!

  • Don’t have a Big Shot? We’ve still got you covered, check out our new Pretty Presents Designer Bows. It comes with enough to make ten paper bows, and it looks fabulous on our new Extra-Large Gift Box. Bows are so much fun! If you want to take your holiday gift wrapping to the next level contact Me or just visit my store,

    VIDEO

    Saturday, August 17, 2013

    Saying Thank You the Photopolymer Way!


    Stampin' Up! has just released it's new "AnotherThank You" photopolymer stamp set and I think you're going to fall in love with it.


    Don't you just love all these images and for $16.95 what a great investment for your sentiment stamp collection. You could use this exclusive photopolymer stamp set for any occasion that calls for a thank you.

    If you've used photopolymer stamps before and been unimpressed, you really need to try out Stampin' Ups! photopolymer stamps to see the difference. They offer a versatile all-clear stamping option, and you'll find they're top-quality. Each stamp will give a perfectly stamped image every time. Photopolymer stamps stick amazingly well to Stampin' Ups! clear blocks and they're easy to place just where you want them. And best of all, you get to enjoy tons of images for a great price!


    Note: The following clear block sizes A, B, C, D, and F which are not included in the set, work best with it. Clickhere to check out our clear blocks.

    Check out this set for yourself and if you want it, you can order at my Onlinestore, just click here.
     
    Other Photopolymer stamps available click here to view


    Friday, August 16, 2013

    Fun With Thinlets Dies


    During the Stampin' Up! Convention in July Penny Hanuszak demonstrator from Abbotsford was one of the lucky recipients of a Label Card Thinlits Die package during one of the Prize Patrols. . You can view the flyer here, but basically this is what the two Thinlits die sets look like.


    So on Tuesday, I was happy to have been invited by Penny Hanuszak a Demonstrator from Abbotsford for a stamping day with her and Sheri Lee, one of Penny's downline . We had the opportunity to play with the Thinlits Die and some other great products, and had so much fun! Here are some of the Christmas themed cards we made using the Thinlits Dies. I wish you could see these in person because the photos just don't do them justice!


    This is the one of the cards Penny made using a card base of Smokey Slate card stock that measured 5 1/2"x6". For the inside of the card she used a piece of Whisper White card stock that was embossed with the  Northen Flurry Embossing Folder and added Rhinestone Basic Jewels to pop those snowflake right off the page.
     
    To  add some glam to the front of the card she used Silver Glimmer Paper that was cut out with the label die from the Label Card Thinlits set. It fits perfectly on th swing label showing a perfect 1/8" edge all round the rim of the label. Love it!
    The smallest snowflake image from the new Festive Flurry Stamp Set was  stamped twice in Soft Sky ink on Whisper White and cut out with the Festive Flurry Framelit Dies.I purchased the Bundle which is shown on page 30 of the Holiday Caalogue.  It includes the stamp set and the Festive Flurry Framelits Die and I saved 15% or $12.00 off the total price. I'm glad taht I bought the bundle as teh stamps and dies work so perfectlly together and there is no fussy cutting. I wasn't really going to buy "another snowflake set this year but I kind of fallen in love with this set and I know I will be using it a lot this year for sure.


    Here's a stunning card made by my downline Sheri Lee. I loved, loved, loved her take on this card. She chose to expand the card so the base is 5 1/2 by 8 1/2". I'll provide a picture tutorial sometime to show you how to get this perfect extension. I think it adds so much more to this card, and I probably will use this version the most when making swing cards, as it just adds so many more possibilities for design


    Here's another card Penny made using the extended card stock measurement. I just love it because it gives some extra space to write your message on the inside. The card base is Soft Sky with touches of Smokey Slate.


    I came up with this card adapting both Penny's and Sherri's ideas and add the Silver 1/8" Ribbon from the holiday catalogue picture doesn't really do it justice I can't wait to order my sets.


    Here is a video on the Thinlits Dies from Stampin' Up! Enjoy!