Well the new Catty is finally here..
the colours are awsome.. and their co-ordinating items are superb. I just can't wait to play some more with them. I will add some samples as soon as I have completed them or get back my swaps. but until then if you would like a new catty please let me know.. and I would be happy to drop one by.
take care and happy stamping.

A Little About Me

- Stamping With Serena aka Reenybeanies
- Burnaby, BC, Canada
- Hi My name is Serena also known as "Reenybeanies" I became a Stampin’ Up! demonstrator because I enjoy Stamping and Crafting. I love being part of a company that inspires my creativity with exclusive stamps and accessories! I Joined Stampin'Up! in 2004 as a Club member I loved it so much spending time with new friends just sitting and talking and of course learning new and exciting techniques so I decided to become a demonstrator so that I could teach people the exciting world of Rubber Stamps. Where you can create Cards, Scrapbook Pages, Home Decor, Books, and More! its just not a craft its a time to spend a little time on you. I also wanted the versatility of having my own home business. I love being part of a company that allows me to plan my business around my schedule. If you want more information about Stampin’ Up!’s exciting products, or about Stampin’ Up!’s unique business opportunity, please contact me either through email or by phone. I can't wait to talk to you and share some fun and exciting projects.
Friday, July 3, 2009
Friday, June 26, 2009
In Colours 2009-2010
In Colours 2009-2010
All I have to say is wow... the colours are just so vivid.. I can't wait to start to use and show you some neat ideas that I am cooking up with these colours... sneek peak anyone...????Sneak Peek
shhhhhhhhhh our secret.
I just can't wait though so many ideas.
And
Just to remind you that the New Catalogue will be mailed after July 7. I will send out notes to all of you just to remind you that they are in my hands and available for purchase or Host a Workshop and get yours for Free.
Friday, June 5, 2009
Punch Art Club Night
Well Wednesday night was Punch Art Club Night ... and I thought I would share what they did.. Stampin'Up! came out this year with a Circle Scissor Plus (Short Terms Circle Cutter) well a few of the ladies wanted to make a punch book with the circles so that they could use it to map out pictures etc... so thats what they did.. here are some pictures to show...


This is the Punch Book


Tuesday, June 2, 2009
In Colours Products
Stampin' Up! just announced that they are evaluating some of their existing product offering, as well as looking for exciting new products we know you'll love. With this in mind, they'd like to recommend that you keep any In Color basic products (card stock and inks) you may have purchased in the past, even though they are retiring, or may have already been retired. It is possible, but not guaranteed, that they may incorporate a few of your favourite In Colours in some other way in the future.
Changes to the Last Chance Lists
There have been slight changes to the Last Chance stamp and accessories lists.
The following stamp sets have been removed from the Last Chance stamp list and will be available for purchase from the dormant list during the 2009-2010 Idea Book & Catalog sales period.
114494 Forever
114492 Beautiful Baby
114486 Birthday Wish
114490 Glad Friends
114498 Flowers in Silhouette
114496 Celebrations
114488 Fun Flowers
114032 Acurelas Maravillosas
Also, the following items were added to the Last Chance accessories list and are available for purchase while supplies last.
116209 Note of Thanks
116210 Birthdays Count
Tutorial: Faux Tile Technique

Supplies
Scoring Tool
Stamp Set
Whisper White Card Stock
Sponge
Pencil
Clear Ruler
VersaMark Pen
Stamping Ink
Embossing Powder
Heat Gun
Step By Step
Step 1
Take your whisper white card stock, Clear Ruler and a pencil and draw light pencil lines in a diagonal motion about 1” apart, go in one direction switch the paper around and draw again going in the other direction creating a diamond effect.
Step 2
Take your scoring tool and score along each of your pencil lines until your entire sheet of whisper white card stock is scored and your diamond pattern is prominent.
Step 3
Take your sponge and your stamping ink and sponge colour all over your paper keep doing this until the entire sheet is cover in colour.
Step 4
Now take your stamp set and using the same colour stamp image in each of the diamond patterns cover the entire sheet of paper.
Step 5
Take your VersaMark pen and using the brush tip draw over your score lines with the pen and while your ink is still wet add the embossing powder and heat set. Do one side first and then the other side.
Step 6
Embellish and you have a wonderful background.

Diorama Tutorial

This Tutorial I used at a recent 3D Class and the Participants just loved it. I borrowed the tutorial from a fellow Demonstrator and you can find the info on her Blog at Stamp with Heather: Diorama Tutorial Thanks Heather.

Start with your cardstock pieces. The back and the front pieces of cardstock are 4 1/4 by 8 1/2. You then score them both 2 inches from each end. The middle colour (mine Celery) is 4 1/4 x 6 1/2 and you score this one inch from each end.

Next cut out the window from your front piece. I left a 3/4 inch border around the window. There are a few ways to do this, I use my Fiskars and measure as I go. You can also draw where you want to cut your window and then use your cutter or an exacto knife.

Then cut the window in your middle sheet. I left a one inch border on this window. This way you can see a bit more of the art you create on this border.
 Embellish your three layers. Remember to make the display interesting and to stamp/embellish even outside the window dimensions because once the card is assembled and open you can see more than just the window.
  Apply adhesive to the 2 flaps on the Celery so the "good side" is facing up. Apply adhesive to the 2 flaps on the Pretty in Pink so the "good side" is facing down.
 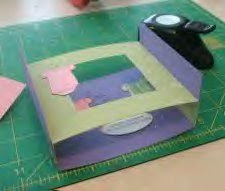 Attach the Celery layer to the bottom layer by folding up the Lilac flaps and adhering to the celery.
  Attach the Pretty in Pink to the Lilac by wrapping the flaps around the Lilac and adhering
Monday, June 1, 2009
The Lists Are Up!!
Boo Hoo….
Can you believe it??? It's June 1st (it's 3 am) and the Going Going Gone lists are up! (the retiring stamp sets AND accessories!!!) I was surprised to see the accessories were listed as well! Now remember, the accessories are first come first serve so don't miss out!!!
As Well,
Do you want to know the BEST part about the retiring Home Decor???? It's 25% off for the month of June!!!! So act fast before supplies run out! Click the link below to view the retired list.
Décor Elements Retired List
Last Chance Stamp Sets List
Last Change Accessories List
If you'd like to place an order with me for any of these supplies (hello, they are retiring the ABC wheel, Upper and Lower Alphabet and the matching pictures....THE perfect teacher sets....sorry about my little rant:) please either email me privately at reenybeandesigns-stampinup@shaw.ca or click on THIS LINK to shop directly on line!
Thanks so much!
Sunday, May 24, 2009
Color-Matched Printer Values For Stampin'Up!
The following are color-matched values for Stampin' Up! ExclusiveColors. This list includes the nine colors retired in 2005. You canUse these values to color-match scrapbook journaling, to create aCustom sentiment inside of a card, or to create a color-coordinatedElement for a hand-stamped party favor. Remember when printing onVellum that it is best to print in a DARK color, layering your vellumOver a lighter color. When printing on cardstock, you may wish to tryDifferent color combinations to achieve either dramatic or subtleEffects, just as you would with your stamping.For those who don't know how to do this: Open Microsoft Word. TypeDesired text in your selected Stampin' Up! R Font. To change the fontColor, choose FORMAT from the top menu bar. Select FONT, then FONTCOLOR. Select MORE COLORS, and then choose CUSTOM. You will find a place to enter R, G, and B "values" for the color mixing. Print your text on your printer and compare to your cardstock ring to ensure they Match.
SOFT SUBTLES
Almost Amethyst: R-189 G-189 B-255 OR H-170 S-255 L-222
**Apricot Appeal: R-255 G-184 B-73 OR H-26 S-255 L-164
Barely Banana: R-248 G-250 B-156 OR H-44 S-230 L-203
**Bashful Blue: R-215 G-235 B-255 OR H-149 S-255 L-235
Blush Blossom: R-255 G-226 B-204 OR H-18 S-255 L-230
**Certainly Celery: R-125 G-153 B-63 OR H-56 S-106 L-108
Lavender Lace: R-215 G-215 B-255 OR H-170 S-255 L-235
Mellow Moss: R-111 G-136 B-60 OR H-57 S-100 L-98
Pale Plum: R-215 G-173 B-211 OR H-217 S-88 L-194
Perfect Plum: R-125 G-61 B-119 OR H-217 S-88 L-93
Pretty In Pink: R-250 G-181 B-201 OR H-243 S-223 L-216
Sage Shadow: R-147 G-187 B-115 OR H-66 S-88 L-151
BOLD BRIGHTS
Brilliant Blue: R-46 G-46 B-182 OR H-170 S-152 L-114
Gable Green: R-197 G-254 B-154 OR H-67 S-250 L-204
Glorious Green: R-57 G-155 B-66 OR H-89 S-118 L-106
Green Galore: R-159 G-253 B-89 OR H-67 S-249 L-171
Lovely Lilac: R-170 G-54 B-255 OR H-194 S-255 L-155
Only Orange: R-254 G-103 B-0 OR H-17 S-255 L-127
Orchid Opulence: R-182 G-109 B-255 OR H-191 S-255 L-182
Pink Passion: R-255 G-83 B-169 OR H-234 S-255 L-169
**Pixie Pink: R- 255 G-118 B-194 OR H-232 S-255 L-187
Real Red: R-212 G-0 B-0 OR H-0 S-255 L-106
Tempting Turquoise: R-113 G-252 B-255 OR H-129 S-255 L-184
YoYo Yellow: R-251 G-229 B-19 OR H-38 S-247 L-135
EARTH ELEMENTS
Cameo Coral: R-255 G-113 B-143 OR H-246 S-232 L-155
Chocolate Chip:R-66 G-28 B-28 OR H-0 S-101 L-47
Close To Cocoa: R-147 G-97 B-69 OR H-15 S-92 L-108
Creamy Caramel: R-214 G-160 B-88 OR H-24 S-154 L-151
Garden Green: R-57 G-125 B-55 OR H-84 S-99 L-90
More Mustard: R-216 G-175 B-0 OR H-34 S-255 L-108
Not Quite Navy: R-0 G-79 B-118 OR H-142 S-255 L-59
Old Olive: R-149 G-146 B-0 OR H-41 S-255 L-75
Really Rust: R-199 G-77 B-9 OR H-15 S-233 L-104
Ruby Red: R-212 G-29 B-30 OR H-0 S-194 L-121
Summer Sun: R-242 G-204 B-16 OR H-35 S-229 L-129
**Pumpkin Pie: R-232 G-138 B-0 OR H-25 S-255 L-116
RICH REGALS
**Always Artichoke: R-68 G-79 B-55 OR H-62 S-46 L-67
Ballet Blue: R-97 G-134 B-205 OR H-156 S-132 L-151
Bordering Blue: R-155 G-155 B-168 OR H-170 S-7 L-158
**Bravo Burgundy: R-100 G-15 B-35 OR H-245 S-188 L-58
Brocade Blue: R-135 G-176 B-219 OR H-150 S-137 L-177
**Elegant Eggplant: R-108 G-0 B-77 OR H-255 S-255 L-54
**Handsome Hunter: R-15 G-51 B-23 OR H-94 S-139 L-33
Night of Navy: R-0 G-0 B-75 OR H-170 S-255 L-38
**Regal Rose: R-251 G-129 B-175 OR H-239 S-239 L-190
Rose Red: R-255 G-27 B-130 OR H-236 S-255 L-141
**So Saffron: R-246 G-210 B-127 OR H-29 S-221 L-187
Taken With Teal: R-0 G-156 B-152 OR H-126 S-255 L-78
NEUTRALS
Going Gray: R-150 G-150 B-150 OR H-170 S-0 L-150
**Sahara Sand: R-149 G-151 B-121 OR H-46 S-32 L-136
Whisper White: R-255 G-255 B-255 OR H-170 S-0 L-255
Very Vanilla: R-249 G-248 B-224 OR H-40 S-172 L-237
Basic Brown: R-66 G-28 B-28 OR H-0 S-101 L-47(using Chocolate Chip)
RETIRED COLORS
*Mint Melody: R-189 G-255 B-189 OR H-85 S-255 L-222
*Mauve Mist: R-255 G-194 B-216 OR H-240 S-255 L-255
*Bliss Blue: R-177 G-216 B-255 OR H-149 S-255 L-216
*Eggplant Envy: R-153 G-0 B-153 OR H-213 S-255 L-77
*Forest Foliage: R-22 G-74 B-56 OR H-112 S-138 L-48
*Baroque Burgundy: R-134 G-0 B-67 OR H-234 S-255 L-67
*Rose Romance: R-250 G-90 B-150 OR H-239 S-240 L-170
*Positively Pink: R-255 G-145 B-177 OR H-243 S-255 L-200
*Marvelous Magenta: R-198 G-0 B-170 OR H-219 S-255 L-99
*Retired
**New Color Available RGB = Red, Green Blue -- HSL = Hue, Saturation, Luminosity
Tutorial: Envelope Die - resized to fit a Gift Card
By Patty Bennett
how to alter our Scalloped Envelope Die to make it BIGGER to fit a credit card - they loved learning this and making one!

step 1: start with a 6x6 piece of DSP

step 2: fold it in ½

step 3: align the folded edge with the 3rd scallop down on the die


step 4: run it through the Big Shot machine
step 5: open up the envelope and burnish out the fold/crease with the Bone Folder

step 6: seal the edges shut with Sticky Strip and you have an envelope sized to fit a Gift Card!


BRAYERED ROSES TECHNIQUE
by PATTY BENNETT


Brayered Roses Create beautiful softly shaded roses using the Brayer.
Supplies:
· Textured Impressions Die – Manhattan Flower from Stampin’ Up!
· Big Shot, Multipurpose Platform, clear cutting pads
· Shimmery White Cardstock
· Brayer
· 2 to 3 coordinating colors – classic ink pads
· scissors
Directions:
1. Emboss the Manhattan Flower die onto Shimmery White cardstock with the Multipurpose platform and the Big Shot
2. Turn the finished image over so the raised portion is facing DOWN onto your work surface
3. Ink your brayer in one color (I used Regal Rose) and then ROLL OFF much of the ink onto scrap paper
4. Roll remaining ink onto “debossed” rose image (raised portion facing DOWN) – in a “hit and miss” fashion – do NOT try to cover the image entirely with color
5. Repeat steps 3 and 4 with a 2nd color – I used Summer Sun
6. Cut image out and adhere to your card or project
You are done! Isn’t that quick and easy and BEAUTIFUL!?

Saturday, February 7, 2009
Sell-a-Bration....

Well, it is that time of the year again for the month of February and March its FREE FREE FREE products when you purchase $75 worth of product.... click on the link above and download a copy of this years Sell-a-Bration catty
For every purcahse of $75 you recieve a free stamp set from this catalouge. if you would like to veiw these wonderful stamps I have a copy of each one and I have made samples using them all and I will be uploading a few samples to my blog in the next few days. so until then if you would like to take advantage of this deal.. give me a call or send me an email.
Also if you sign up to become a demonstrator during Sell-a-bration months. you will earn even more FREE FREE FREE Product.. its the best time to sign up and even save 20% on your starter kit.. call me today or email me for more information I will be happy to sit down with you and point out all the benefits of a demonstrater has... well happy reading
I have been bad..
Well, first of all I have to say that I have been bad.. I started this back in April and well its almost a year and this is my third post... I really have to keep it up... but sometimes I feel at a loss for what to actually put on here... except cards and promos..but I am going to try at least once a week add something here...
Subscribe to:
Comments (Atom)