

Diorama Tutorial

This Tutorial I used at a recent 3D Class and the Participants just loved it. I borrowed the tutorial from a fellow Demonstrator and you can find the info on her Blog at Stamp with Heather: Diorama Tutorial Thanks Heather.

Start with your cardstock pieces. The back and the front pieces of cardstock are 4 1/4 by 8 1/2. You then score them both 2 inches from each end. The middle colour (mine Celery) is 4 1/4 x 6 1/2 and you score this one inch from each end.

Next cut out the window from your front piece. I left a 3/4 inch border around the window. There are a few ways to do this, I use my Fiskars and measure as I go. You can also draw where you want to cut your window and then use your cutter or an exacto knife.

Then cut the window in your middle sheet. I left a one inch border on this window. This way you can see a bit more of the art you create on this border.
 Embellish your three layers. Remember to make the display interesting and to stamp/embellish even outside the window dimensions because once the card is assembled and open you can see more than just the window.
  Apply adhesive to the 2 flaps on the Celery so the "good side" is facing up. Apply adhesive to the 2 flaps on the Pretty in Pink so the "good side" is facing down.
 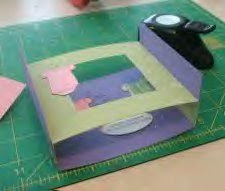 Attach the Celery layer to the bottom layer by folding up the Lilac flaps and adhering to the celery.
  Attach the Pretty in Pink to the Lilac by wrapping the flaps around the Lilac and adhering
No comments:
Post a Comment